
Eggs en Cocotte (Baked Eggs)
Eggs en Cocotte is the perfect recipe for slow, cozy, weekend mornings! Once you master this simple recipe for cheesy, custardy baked eggs, you’re going to want to make it all the time!

There is something seriously magical about slowly cooking eggs in individual pots of cream and Boursin cheese! Eggs en Cocotte or shirred eggs as they’re sometimes called are prepared in ramekins and baked in a water bath (like cheesecake) resulting in creamy, custardy eggs perfect for dipping or spreading on buttery toast!
Looking for the perfect pairing? Serve eggs en cocotte for brunch with buttery toast, breakfast potatoes and an herby salad.
Ingredients You’ll Need
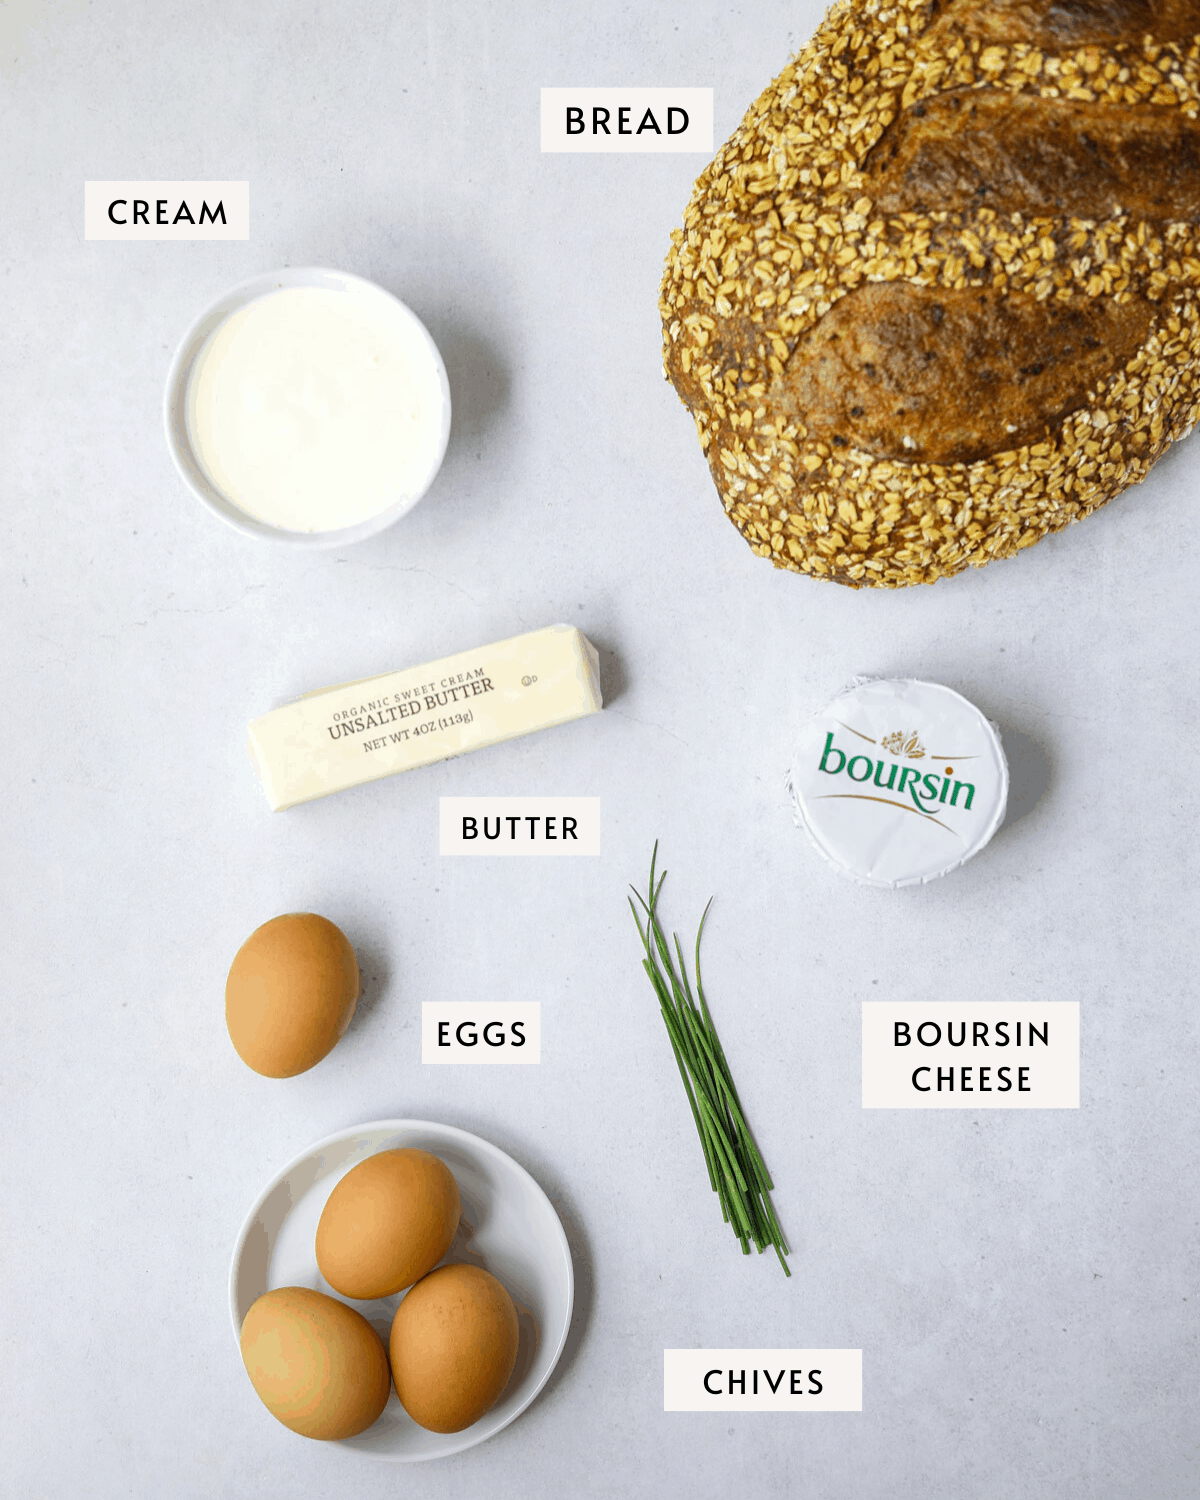
Here’s what you’ll need to make this recipe: eggs, cream, butter, Boursin cheese, chives(optional) and bread.
Recipe Variations:
Looking to mix it up? Eggs en Cocotte can be a blank slate for so many different ingredients! Try one of these variations:
- Mushroom & Gruyère Cheese
- Spinach and Goat Cheese
- Sun-dried Tomatoes and Feta Cheese
- Bacon and Cheddar
- Black Pepper and Parmesan Cheese
Recipe Step by Step
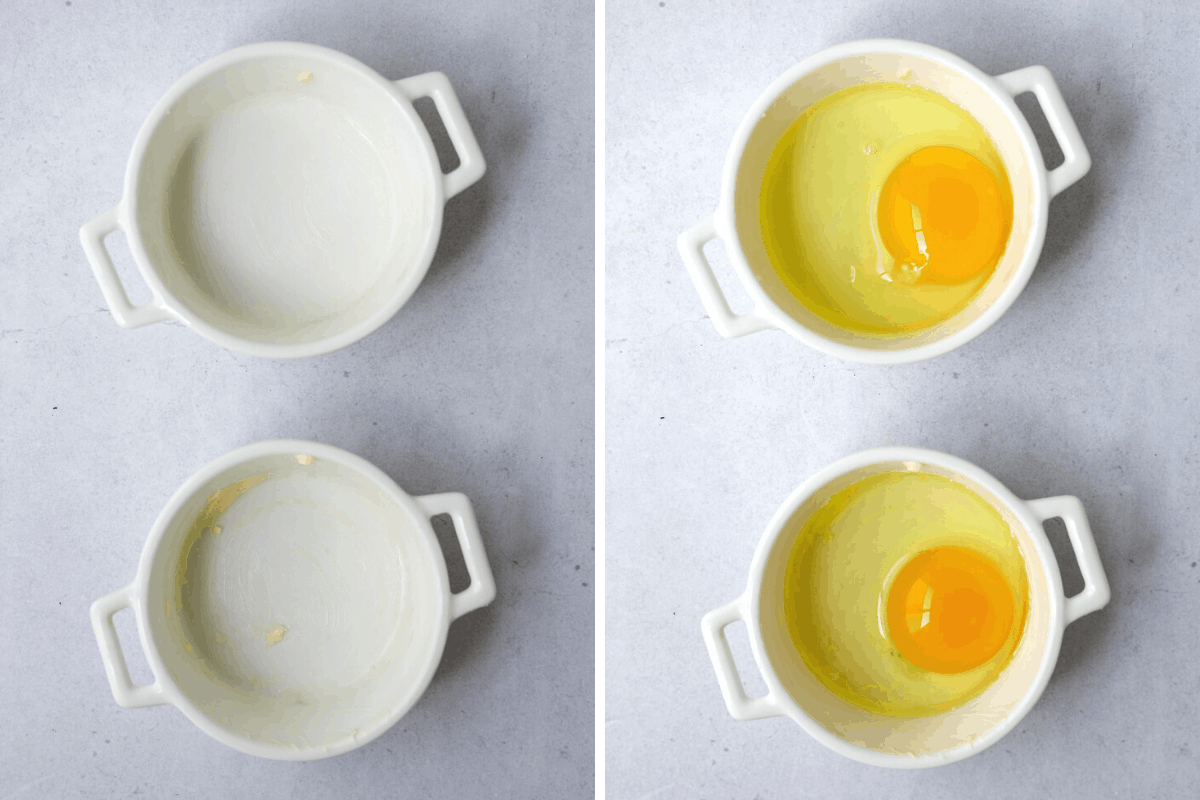
Step 1. Prepare the Ramekins
These are the ramekins I used. I like them because they have tight-fitting lids. Rub your ramekins with just enough butter to coat so that the eggs don’t stick. Crack 1-2 eggs into each ramekin then top with cream and cheese.
Step 2. Prepare a “Bain-Marie” or Water Bath
Cover the ramekins with a lid or foil then place in a high sided baking dish. Pour boiling water into the baking dish, about 2/3 of the way up the sides of the ramekins.

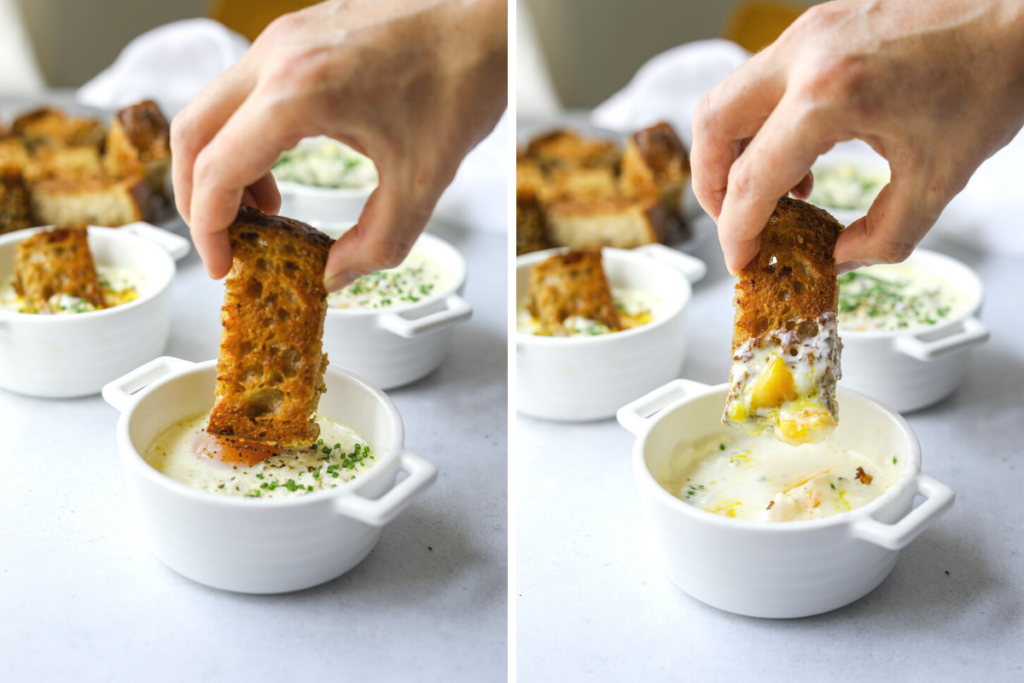
Step 3. Bake
Bake the eggs until they reach your desired doneness. Top with salt, pepper and minced chives. Serve with warm buttered toast for dipping.
Cooking times will vary greatly depending on how you like your eggs. I’ve found that 12-15 minutes is good for runny yolks, 20-25 minutes for jammy, firmer yolks.
FAQs and Expert Tips
Egg doneness is so much of personal preference. I like my egg whites fully set with a soft gooey, jammy yolk. I recommend setting a timer for 12 minutes to start. After 12 minutes, have a peek at your eggs. The cream should be just barely bubbling around the sides and if you give the ramekins a gentle shake there will be a slight wobble on top. Not there yet? Close the oven and check them again in two minutes. Continue until your eggs are just how YOU like them!
A bain-marie is a water bath that creates even, gentle heat around whatever your baking. Cheesecakes and custards are typically baked in a bain-marie.
Boursin cheese is a soft, fresh cheese from France thats seasoned with garlic and herbs. It’s texture is similar to a whipped cream cheese. It’s great for eggs or spreading on toast. Boursin cheese is readily available in most supermarkets. If you need a substitute try an herbed goat cheese.

Check Out More Great Breakfast Recipes:
I love to hear from readers and always do my best to respond to each and every comment. If you make this recipe be sure to leave a comment and/or give it a rating! Don’t forget to follow along on Pinterest, Facebook, and Instagram for all the latest updates!

Eggs en Cocotte (Baked Eggs)
Ingredients
- 4 whole eggs
- 4 tbsp heavy cream
- 4 tbsp boursin cheese
- 2 tbsp butter
- 2 tbsp chopped chives
- salt and fresh cracked pepper
- 2 slices grainy, seedy bread
Instructions
- Preheat the oven to 350 and bring a kettle of water to a boil. Line each ramekin with a little bit of butter. Crack two eggs into each ramekin. Top each egg with cream and crumbled cheese.
- Put the ramekins into a high sided baking dish. Pour the boiling water into the baking dish until it reaches halfway up the sides of the ramekins. If your ramekins have lids put the lids on, if not cover the entire baking dish with foil.
- Bake for 12-25 minutes or until the eggs reach your preferred doneness. Season with salt and pepper and serve with chopped chives and buttery toast!
Notes
- Mushroom & Gruyère Cheese
- Spinach and Goat Cheese
- Sundried Tomatoes and Feta Cheese
- Bacon and Cheddar
- Black Pepper and Parmesan Cheese
- Egg doneness is so much of personal preference. I like my egg whites fully set with a soft gooey, jammy yolk. I recommend setting a timer for 12 minutes to start. After 12 minutes, have a peek at your eggs. The cream should be just barely bubbling around the sides and if you give the ramekins a gentle shake there will be a slight wobble on top. Not there yet? Close the oven and check them again in two minutes. Continue until your eggs are just how YOU like them!
- Boursin cheese is a soft, fresh cheese from France thats seasoned with garlic and herbs. It’s texture is similar to a whipped cream cheese. It’s great for eggs or spreading on toast. Boursin cheese is readily available in most supermarkets. If you need a substitute try an herbed goat cheese.


I made these this morning. I need to experiment some more to nail the cooking time, but the flavor is great! Thank you for the recipe.
Creamy eggs baked to delicate, savory perfection. 온카패스
Are those 7 oz or 10 oz ramekins?
I think they’re 7oz but I can’t remember exactly – sorry!
I LOVE this recipe… I’ve made it many times… My only frustration is it has never, no matter what I do, only taken 12-15 minutes… not even 20… It takes more like 30-35 minutes. I often end up over cooking the eggs because I end up putting them back in for the 3rd time, frustrated and put them in too long in that last time in the oven. Next time I’m going to try it without the foil as suggested by another reader so I can see it easier… although I’m kind of a claud and I’m not sure I’ll be able to keep the water out of the ramekins that way. Lol!! All of that said… frustration aside, it’s one of my and my family’s favorite breakfasts… even when the eggs are slightly over cooked.
Hi Julia, I’m so glad you and your family like this recipe! There is so much that goes into the timing of these eggs; their size, individual oven temperatures/strengths, the size of your ramekins etc… It really is one of those recipes that you have to hang by the oven for the last few minutes and keep checking.
A few suggestions for you; first, to speed up the cooking process start with room temperature eggs. You can leave them out overnight or place the (whole) eggs in a cup of warm water for 5 or so minutes – hot tap water from the sink is fine. This should shave a few minutes off the total cook time.
Second, if you check them after 20 minutes and they’re still *slightly* runny, rather than putting them back in the oven, leave them out, in the hot water bath, covered with foil and check them again in 5-10 minutes. Even out of the oven the residual heat from the hot water bath will continue to gently cook the eggs without over cooking them.
Lastly, if you check them after 20 minutes and they’re *really* runny, leave them in the oven, covered but turn the oven off. Check again in 5-10 minutes.
Let me know if you try any of these tips and if they work for you! Thank you again for making this recipe.
xx Leigh
I’m at the point where I’m no longer an amateur in the kitchen. I’m excited to try new recipes with techniques I haven’t tried before. What I want to know is the name of the bread in the picture? It looks so airy and delicious!
Great recipe! It will take me a few more tries to get my preferred doneness, but I can see this recipe winning over my Sunday morning breakfast menu for its ease and adaptability.
Timing is critical.
Jacques Pepin uses stove top gas, glass lid cover water bath not to boil over so watch carefully. And do not use lids on ramekins, totally unnecessary extra wash up and blocks view of egg and cream solidifying to your soft or hard preference. I used Costco hand size thick slice smoked ham cubed today with second layer of scallions green onions and 3rd layer of cooked canned mushrooms. Delicious!
A new and delicious way to enjoy breakfast! Will be adding this to our morning rotation. Hubby loved them.
I’m so glad to hear that! Thank you, Susan! xx
These were delicious but the nutritional information provided is wildly inaccurate. I pulled the info from 2 eggs, 2 tbsp cream, 2 tbsp butter, 2 tbsp boursin (alouette in our case but a similar product) and got 621 calories and 18g protein, not 330 calories and 3g protein. This raised flags for me because a single egg contains 6g of protein, and this recipe has 2 per serving.
Hi James, the nutritional information provided in the recipe card is just an estimate. That being said, I ran the ingredients through a secondary calorie and nutrition calculator and got the same results. Are you sure you’re looking at one serving rather than two?
I’m getting the same as James. Your recipe card says 2 servings but maybe it’s actually 4?
Made these this morning for my daughter who’s off to college. She and my husband loved them. A nice delicious breakfast. Great recipe.
I tried the glass ramekins with aluminum foil instead of porcelain because that’s what I had available. I would definitely go with a longer cooking time. After 18 minutes the whites were still quite translucent. I added another 8 minutes of cooking time and they were closer to what I would expect this recipe to be. It was very creamy and flavorful.
Tried this after seeing one of my favorite cooking youtubers (David Seymour) try a similar recipe, came straight here to bookmark this one because I knew I had to make it! I have made this multiple times now with varying ingredients and it is always SO GOOD. I had been bored with my usual breakfast foods forever and this saved my mornings. Thank you thank you! Best recipe ever!
Hannah, thank you so much for this lovely comment! I’m so glad you’ve been enjoying the recipe. xx
Would this still work if I use the bain Marie method with a muffin tin and use foil on top?
Hi Rebecca, I haven’t tested this myself but I’ve heard from others that a muffin tins will work! I would love to hear how they come out if you decide to try it. Good luck!
Two notes. First: To help keep yolks runny, take eggs straight from the fridge to the ramekin. For firmer yolks use eggs that have warmed up a bit. Second, use a spoon to center your yolks. Touching the side will speed up cooking the yolk.
Easy and fun recipe! Took 18 minutes to achieve the custard consistency desired probably due to our higher altitude. Turned out delicious!
This was delicious, I’ve never had boursin cheese before which is amazing – just like eating garlic bread. The only thing I would do differently next time would be to halve the cream as it pooled a bit on top. Will be making again
Would I be able to do this in a muffin tin as long as I use the Bain Marie method ?
Do you have a suggestion for making this dish without ramekins? Would it even be possible?
Hi Heather, You could really use any small, oven-safe baking dish. Just keep an eye on the cook time, it could take more or less time depending on the size, and make sure you butter it well. Good luck!
Definitely going to try this with the Boursin as called for in the original recipe, but thank you so much for including some variations!!! This seems like an easy breakfast, and the fact that you can change up the inclusions will for sure keep me coming back to it!
Yes! This recipe is super versatile! Hope you love it!
Can’t wait to try this recipe! Looks Rich in flavor
Hope you love it!
Delicious
So glad you enjoyed it!
Can I use glass instead of porcelain? Does that effect the temp or cook time?
That should be fine, just make sure it’s oven safe!
Can’t wait to try this!